For our project we are using shaders to replicate the depth of field for the camera. The shaders online certainly work but I was not happy with the lack of explanation or the procedure within those shaders, so I have decided to make my own to replicate depth of field.
Within this post I am just going to explain some introductory concepts about using shaders in Three.js and led up to the final shader results in the later posts.
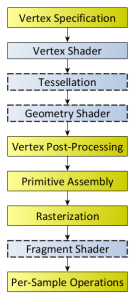
Before going into details about the shaders I am going to talk a bit about the rendering pipeline and then jump back. The rendering pipeline is the steps that OpenGL (The API that renders 2D and 3D vector graphics) takes when when rendering objects to the screen.
This image was taken from the OpenGl rendering pipeline page here.
Glossing over some things a bit, there is basically two things happening. First the pipeline deals with the vertex data. Then the vertex shader is responsible for turning those 3D vertices into a 2D coordinate position for your screen(responsible for where objects get located on the screen). After some other stuff rasterization occurs which makes fragments(triangles) from these vertices points. After this occurs the fragment shader occurs. This fragment shader is responsible for what colour the fragment/pixel on screen has.
This whole pipeline runs on the GPU and the only two parts of this pipeline that are programmable by a user are the vertex shader and the fragment shader. Using these two shaders we can greatly alter the output on the screen.
For Three.js/WebGL the shaders are written in GLSL (with three.js simplifying things for us a little bit) which is similar to C. This shader file can be separated into three main parts: uniforms, vertex shader, and the fragment shader.
For the first part the uniforms this is going to be all the values passed from the main JS file. I’ll talk about passing in values in a later post. A basic example is;
uniforms: {
"tDiffuse": { type: "t", value: null },
"value1": { type: "f", value: 1.2 }
},
tDiffuse is the texture that was passed from the pervious shader and this name is always the same for three.js. The types that can occur in the uniforms are many but some of the basic ones are i = integer, f=float, c=colour, t=texture, v2 = vector2 (also 3 and 4 exist), m4 = matrix4 etc….
The next part is the vertex shader, because of what I want to do (change the colour of the pixel to create a blurring effect) I don’t need to change anything in here, but it is still required to write this in the shader file. If you want to code one you must code the other as well.
vertexShader: [

  "varying vec2 vUv;",

  "void main() {",
    "vUv = uv;",
    "gl_Position = projectionMatrix * modelViewMatrix * vec4( positio       n, 1.0 );",
  "}"

 ].join("\n"),
Varying meaning that the value change for each pixel being processed. In this one we have vUv which is a vector that holds the UV (screen co-ordinates) of the pixel and is automatically passed in by three.js. The next line just takes the 3D coords and projects them onto the 2D coords on your screen. I am going to skip the explanation of why this works as it is not important, just look it up or ask me if you really want to know.
Now for the important one, the fragment shader;
fragmentShader: [

"uniform sampler2D tDiffuse;",
"varying vec2 vUv;",

"void main() {",
  "vec4 color = texture2D(tDiffuse, vUv);",
  "gl_FragColor = color;",
"}"

].join("\n")
For this vUv is the same as from the vertex shader and tDiffuse is the texture that was passed in (stated as sampler2D here). In this main loop we are grabbing the RGBA value from the passed in texture as coord vUv and then assigning it to the output pixel.
This is the shader I will be using to create a depth of field and for the rest of the posts I will be looking at this shader only.
That’s it for the introduction, next post I will start to get into the fragment shader and image convolution.
Cheers,
-Barbara
